How to Recover an Unpaid Invoice as a Freelancer

Delayed payments are one of the biggest problems faced by freelancers. In fact, many consider quitting freelancing for this very reason. As an independent contractor, you rely on timely payments for regular cash flow and to cover overhead costs like equipment rental.

You’ll have already invested significant time and effort into the project so not getting paid on time can be frustrating. It’s important to remain calm and follow a set of commonly used business practices when chasing late invoices – this will help protect valuable client relationships.

You can’t start chasing an invoice until 30 days after it was submitted and it’s not uncommon for businesses to wait until the end of this period to settle their bill. Two days after an invoice is due, send a follow-up email to inquire about any issues with the invoice. One of the most common reasons for delayed payments are typos or errors in the original invoice. To avoid this problem, we recommend using one of our invoice templates.

Continue reading to learn more about how to professionally chase late invoices:

Best Practices for Chasing Late Invoices

A Free Invoice Template for Freelancers

Recently I wrote several tips for getting paid faster – and many of these related to the information and layout of your invoices. It’s important to get this right, and is something a lot of freelancers get wrong when they are starting out, so I’ve put together an invoice template for you to use.

The template is available in several formats below. Feel free to edit and use the template as you wish, and if you have any suggestions for improvements be sure to let me know in the comments.

Open Document Format Invoice Template
Word (.docx) Invoice Template
Word 2003-2007 (.doc) Invoice Template
PDF Invoice Template

The Difference Between US and UK Invoices

One of the most important things that most freelancers need to do is to get familiar with invoices.

Because your invoice is the only legal way that you can get money into your business, it’s important that you be aware of what an invoice is, how to make one, and what you need to include in it.

However, invoicing can be quite confusing by itself. It can get even more confusing if you try to figure out how to do invoices in different countries, such as the US and UK.

Bernard Meyer, Head of Marketing at InvoiceBerry—the online invoicing software made for freelancers and small businesses—gives us a look at these two regions and discusses their main differences.

What is an invoice?

An invoice is basically a document that the supplier (seller) sends to the buyer after the goods or services have been delivered. It is legally binding if both parties have agreed to the terms of the sale.

Because of this, an invoice is also a non-negotiable document.

To the seller, the invoice is known as a sales invoice, while the buyer calls it a purchase invoice. These are the same invoice, and the difference is only in the name.

The sales invoice goes to your account payable (money that you owe) and the purchase invoice goes to your account receivable (money that you’re owed).

A US Invoice

The US is, fortunately or unfortunately, quite relaxed when it comes to rules and regulations on invoicing. For the most part, if you are a B2C selling to US customers, you probably won’t need to send out an invoice at all.

Most businesses in the US simply issue receipts to their customers.

Receipts are different from invoices in that they aren’t usually itemised. However, the most important distinction is that they are a record of payment that has already been submitted. An invoice is for payment that still needs to be completed.

However, if you are providing services to a business, then you’ll need an invoice. This is because businesses have accounting departments that will not be able to make payment without a proper invoice.

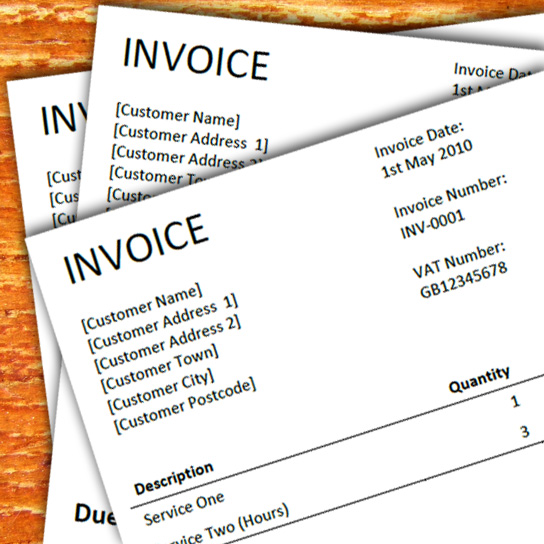
For this, you’ll need the following items in your invoice:

  • the name and contact info of the seller
  • the name and contact info of the buyer
  • the word invoice prominently displayed
  • a unique invoice number and the date of the invoice
  • a description of the product/service, including the unit price and quantity
  • the date that the product/service was provided
  • the total amount being charged
  • and lastly the due date for the payment

Instead of having to create your own invoice from scratch, you can download one of the many US invoicing templates here.

Lastly, you may or may not need to add sales taxes to your invoices. This depends largely on the state or local government that you’re in, but it also depends on exactly what services you’re offering.

Some states may only require you to add sales tax if you’re a registered business. Others may require it if the invoice exceeds a certain amount.

Because of the size and the political composition of the US, it’s difficult to determine who needs to add sales tax or when. It is best to look at your own region in the US to determine if you’ll need to apply sales tax.

The UK Invoice

Invoices for the UK are a bit more consistent and regulated than the US counterparts. The largest difference is in the VAT required for UK businesses.

Generally, you only need to apply VAT if you are a VAT-registered business.

According to HMRC, you have to register for VAT if your VAT taxable turnover (everything that isn’t VAT exempt) is more than £83,000 in any 12-month period.

If you are not, there’s no need to apply it and you will only need to add the same parts to your invoice as listed above.

However, sole traders will have to include:

  • the sole trader’s name or a business name the trader is using
  • if using a business name, an address where legal documents can be delivered

Limited companies will have to include:

  • the full company name as it appears on the certificate of incorporation
  • (if adding any names of directors on invoices) the names of all the directors

If you are VAT registered, you will need to use a VAT invoice, which is an invoice that also includes your VAT registration number.

Selling Between the US and UK

One complicated question is whether you need to apply VAT or sales tax to goods or services sold across the Atlantic.

If you are a US business, you may know what the answer is: it depends. It depends on your state and local government requirements.

For UK citizens selling goods to the US or importing goods from the US, it’s much more cut-and-dry.

Most goods exported to the US from the UK don’t need to have VAT added as long as the proper export documentation is kept.

For goods imported from the US, the UK VAT is usually paid on import.

However, for services performed in the US, there are many different requirements. This is a particularly complex set of rules. For a list of services that require special and general rules, you can visit this informative page here.

These are general differences between US and UK invoices. However, the most important takeaway is to contact your local government authorities to determine what your requirements are.

If you think we’ve missed some important information here, or just to say hi, leave us a comment and let us know!

5 ways to stay on top of your expenses

As a freelancer you’ll almost inevitably spend money out of your own pocket on your business’s costs.

It’s important to keep track of that, partly to make sure you don’t pay more tax than you should, but also because the costs you pay out of your own pocket still count as costs of the business, so if you don’t track them, you could think your business is more profitable than it is – which means you’re at risk of charging too little, or running out of money.

Emily Coltman ACA, Chief Accountant to FreeAgent – who provide an award-winning accounting system for freelancers and small businesses – gives five top tips to help you make sure you don’t miss out any of your expenses.

Keep all your receipts together

You’re likely to pick up a lot of receipts for out-of-pocket expenses, like train tickets or bus tickets.

Have a set place to keep these, whether that’s a particular slot in your wallet, a certain pocket in your laptop bag, or a clear plastic wallet that you carry with you.

This makes it much easier to keep all your receipts and lessens the risk of losing any of them.

Schedule a regular time

Take a day each week, or each month if you don’t have many expenses, to take all your receipts out of their designated storage place and process all of them together.

If you make a regular appointment to do this then you’re less likely to leave them and forget about them.

Use a mobile application

Once you’ve collected all your receipts and set aside some time to process them, use a mobile application like ReceiptBank or Expensify, which will let you literally photograph your receipts on your mobile phone and do all the rest of the work for you, including posting the receipts to your online accounting system.

Make use of travel time

If you have a mobile application that you can use, then you can photograph and process your receipts wherever you are.

I’ve processed my expense receipts while waiting at Heathrow Airport, or in the back of a taxi, or even walking across London – time that I couldn’t otherwise spend working.

This makes the best use of your time while ensuring that you don’t miss claiming any expenses.

If in doubt – don’t miss it out!

If you’re not sure whether or not you should include a certain expense in your business costs, then don’t just leave it out – ask your accountant whether you might be able to claim it.  You never know – don’t risk paying too much tax for the want of asking a quick question!

Managing pieces of paper is never easy but there are tools out there to help you keep track of everything you’ve spent personally on your business and make sure that its accounts are correct.

10 Simple Ways to Get Paid Faster

Getting paid after completing a job can be both the best and worst part of being self employed – the first big cheque you get in will be incredibly motivating, but the time you spend chasing clients for later payments will be very frustrating, and having a client go bust or refuse to pay at all could ruin our cash flow.

I’ve put together some tips so that hopefully this will never happen to you.

Got some tips of your own? let me know in the comments section!

1. Agree payment terms up front

It’s very easy to get carried away at the start of a project with a new client, and be eager to impress and show off your creative talent that you agree to start work before letting them know your payments terms. Always make sure you agree in writing your payment terms before agreeing to start work. This could either be as part of your standard terms and conditions or via something as simple as an email exchange.

Personally I ask for 50% payment up front as a deposition and 50% before the final work is handed over on all projects under £2000. For larger projects this can be broken down further to payments of 25%/25%/50% or even four payments of 25%. You may be worried about asking for such a large payment up front, but if a client isn’t willing to pay up front it’s a good sign that they may be having cash flow problems themselves.

If you’re planning on using terms of anything less than 30 days on your invoices it is best to be clear about these up front too. Using task based milestones also helps as the client will associate the payment with the work being completed rather than as spreading the payment over the duration of the project. It will also incentivise you to get the work done on time!

Finally, if you’re in the UK and VAT registered – make sure you make sure you are clear on your quotes weather your prices are inclusive or exclusive of VAT.

2. Make sure your invoice contains all required information.

It’s important that your invoice have all your company information on them as well as payment details, and the clients information. Ensure that you are using the correct client company name and address, and that your figures and dates are accurate. It’s embarrassing to have to re-issue and invoice if you get something wrong, and if the client spots a mistake they may use it as a reason to delay payment.

As a rule, you should be including the following information on all your invoices:

  • Your full company name (and logo).
  • The invoice date
  • The invoice number (This should be unique to each invoice, and preferable sequential).
  • Your registered address.
  • Your company number (if applicable).
  • Your postal address.
  • Your client’s company name or name.
  • Your client’s address.
  • A job reference or purchase order number (if the client have provided one)
  • An itemised list of the services you have provided (see point 5).
  • The invoice due date (see point 3).
  • Your payment details (see point 4).
  • A detachable payment advice slip.

And if you’re in the UK and VAT registered you also need to include:

  • Your VAT registration number
  • An breakdown of the VAT which has been added to each item on your invoice, and the rate at which this has been charged.
  • The total amount of VAT charged

3. Make the due date more prominent.

Make sure that the Due date on your invoice is clearly visible, and more prominent than the rest of the text on the invoice. This will ensure your client knows when to pay and makes it harder for them to make excuses about forgetting or not knowing the invoice was due.

If they’re organised they will be entering this information into their accounting systems, which may mean they are less likely to pay early, but will ensure that you get payment before the invoice goes overdue.

4. Include your payments details – all of them.

Be as flexible as you can with payment methods, and include all your details. My preference is for payment via bank transfer as this is fast, and easily auditable, however some clients (usually larger businesses, charities and government departments) prefer to pay by cheque. So make sure that you include your bank details, a postal address and the name or company which cheques should be made paypable to.

You might want to also consider accepting PayPal if you are selling services or products to smaller companies, individuals or trading internationally. If you are doing repeat business or selling subscription or one-off services via a website it may also be worth setting up an internet merchant account and payment gateway to enable you to accept payments by credit card – however keep in mind that it will typically cost you around 3-5% of the transaction value plus a monthly fee to receive payment this way if you are processing low volumes.

5. Itemise your invoices.

Giving vague descriptions of the services you have provided will make it easy for the client to query the invoice and delay payment, whereas providing a detailed breakdown of the work carried out will remind the client and anyone within their organisation exactly what is being invoiced for. It’s also a requirement if you are charging VAT.

6. Email a copy to your client.

Posting invoices will take time, and will allow the client to make excuses about not receiving the invoice or misplacing it. Make sure that you email a copy of the invoice to the client as soon as the invoice is produced.

Sending a copy of the invoice by both email and post is the ideal solution, as the client will hopefully have already read and verified your invoice when they receive your email, and the copy in the post will act as a reminder to pay. It also makes it much harder for them to try and wriggle out of paying.

After you have complete a few jobs for a client you get an idea of how long they take to pay and if they need reminding. For those clients who pay quickly or consistently a few days before the invoice goes overdue I usually won’t bother posting a copy, as there is a time and cost associated with this.

7. Thank your client.

One piece of information to include on your invoices which I didn’t mention earlier is a simply thank you. This should be along the lines of ‘Thank you for you custom, if you have any questions please contact (You) on (Your phone number). This way if there are any queries relating to the work carried out or payment details the person processing the invoice can quickly contact you – it may not always be your contact within the organisation who deals with the accounting.

8. Send reminders.

Always send reminds when an invoice goes overdue, or even leading up to the due date. Make sure the reminders are written in a friendly tone and remain professional. Rather than asking for the client to pay the invoice, try asking for an anticipated payment date or ask if there is anything you can do to help such as set up a payment plan to help with their cash flow.

I would recommend sending a reminder three days before the due date if no payment has been received, the day after the due date and then once per week after that. Follow up and reminders for overdue invoices with a polite phone call to check that the client is happy with the services provided and has received the invoice.

9. Stay calm.

Clients who consistently pay late can be infuriating, however getting angry or making threats rarely helps. It may get them to settle their invoice, but will guarantee you lose out on any future work from them. Becoming personal with lines such as ‘I need payment so I can ‘feed my family’/’pay the rent’/’pay my tax bill’ are also a big mistake.

10. Thank your client again.

Always let the client know once you have received payment and thank them again for their business. I also use this an opportunity to ask if they have any other work they would like quoting, or suggest additional work which could be carried out to extend or compliment the original project.

This list is by no means comprehensive – if you think I’ve missed anything or disagree let me know in the comments!